Filled Cupcakes, Cake Decorations and more……

Signature cupcakes can be produced with ease at home. Start with your favorite  homemade cake recipe or a quality cake mix. You will get a lot of recipes on the net or in confectionery recipe books. In this article, we will talk about simple tips on how to make your cupcakes look good and make a signature cake decoration.
Start with a favorite homemade cake recipe or a quality cake mix. Prepare batter according to recipe or box directions.

1. Ideas for optional ingredients for folding in the batter
You can add a twist of taste to your normal cupcake batters. You can use chopped nuts, chocolate drops or blossoms, peanut butter , sugared hazelnut bits, dried fruit pieces.

2. Pour batter in signature cupcake papers
You can find trendy cupcake/muffin liners in Cake Decorating stores or online cake decorating suppliers, as well as, at specialty food markets.

3. Three power Techniques for Filling Cupcakes

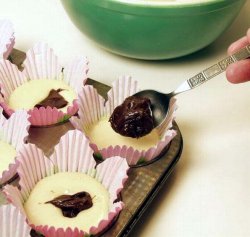
Technique No 1 – Add Filling & Bake Later

Tip of the day: Dense batters work best to keep fillings from sinking to bottom.

Cake Decorations

You can work with fruit fillings (canned pie fillings or jams), ganache cream pie fillings available in the market, etc.

Technique No 2 Bake, Add Filling Later

Cake Decorations

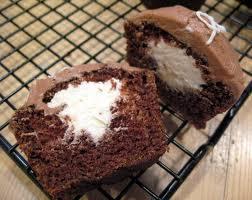
This is the most preferred method for fillings. Insert a pastry bag tip into the center of slightly cooled cake, and squeeze to inject the filling. Use a small piping bag tip to make a hole. You can use mousse fillings, cream pie fillings, meringue or whipped heavy cream, lemon filling, etc.
(#3 or #5 Small Hole Tip recommended for filling cupcakes).

Technique #3 – Bake, Add Flavor Later
Insert the bottle tip into baked cake & squeeze while pulling out. The 4 oz & 8 oz plastic bottles are easy to use & handle.

4. Cake Frostings
You can use butter frosting, buttercream frosting, cream cheese frosting, creamy white frosting, fudge frosting, ganache, meringue frosting. You can use different colours to add dimension to your cupcakes. Garnish your frosting with chocolate chips, sprinkles or cake decorations available at your local cake decorators in Australia.

5. Super Simple Cake Decorations
Now that you are done with your delicious cupcakes, play dress up for the occasion and they are ready to be flaunted.
Popcorn Cupcakes

Popcorn Cupcakes

1. Frost the cupcake with white icing. Create the popcorn effect by cutting one mini marshmallow in half. Squish the two pieces back together into a whole mini marshmallow, pinching firmly. Pile the finished popcorn onto the frosted cupcake.

2. You can create a buttery look by either diluting a drop of yellow food coloring in water and brushing it on with a clean paintbrush or mixing pastel yellow marshmallows in with the white.

3. To make the band, cut a strip of construction paper about 1 1/4 inches by 8 inches, but If you are creating many cupcakes, design just one band and color photocopy it. Wrap the band around the cupcake and secure it with a tape.
You can visit our cupcake toppers section and choose from a variety of cake decorations such as flowers, blue baby accessories, assorted balls, baby clothes assorted, bags assorted and much more.
The New Car Tire Cake with Jet Black FondX Elite

Learn to make this three tire Tire cake, which is easier than it looks.

Things you will need:

  • Elite Rolled Fondant: Jet Black

  • Tire Molds

  • CMC Fondant Stabilizer

  • Pasta Machine (Optional)

  • Roul Pat Mat

  • Rolling Pin

Steps:

  1. Prepare the Fondx elite with the help of CMC. You can start with 1-2 tsp of CMC into 1 pound of FondX. (Adding CMC strengthens the body of the fondant and keeps the shape and detail strong over time. CMC is used as a fondant stabilizer that can transform FondX into your own tasty gum paste)

  2. Next, knead the fondant. Remember, kneading is the most important part of using Fondx. So, don’t rush through this process. Have patience and continue kneading. When you notice that the fondant has a nice stretch, you are ready to start rolling.

  3. Before rolling, use little powdered sugar as it works best when rolling a fondant elite. This will prevent sticking and rolling will be easier.

  4. Now, prepare the top of the cake with a nice flat surface.

  5. Once done, use the first of the three tire molds. For the bottom tire, we will use mold 406. Begin by rolling out the fondant to be of the appropriate size of the mold, then trim the excess. Here, if you wish, you can use a pasta machine. Take the Fondx elite and pass it through the machine. It saves a lot of work and effort.

  6. Place the fondant in the mold and use the rolling pin to spread it evenly throughout the mold to capture all the details.

  7. To put the tire thread on the cake, use the mold to hold the shape together and press firmly on the side of the cake, using the mold to apply or preserve the tire details. You can rub a little bit of shortening to connect the molds and shapes.

The same kneading and application process is to be applied for middle and top tire. However, for the middle tire, we will use tire mold 401 and for the third tire we will use a slimmer mold 405.

Finally, stack them up, and it’s done!

The Making of the Largest Fondant Edible Scene

Held in Tulsa, Oklahoma, the 2010 Oklahoma State Sugar Art Show was the most competitive cake competition in the U.S., and the second largest in the world.

With 75 cake decorators, 48 hours, 3,000 lbs of FondX rolled fondant, 32’x28′ of stage space, and over 1,000 lbs of cake, the Largest Tableau made the event ‘larger than life’.

For the eventful cake, 3 team leaders ‘The Cake Chicks’ – Cheri Elder, Bronwen Weber and Carolyn Wanke Mangold, made it possible. They had divided responsibilities as follows:

Cheri Elder – Gigantic tree and a bunch of little figures

Bronwen Weber – Making Mr and Mrs Franky, getting them married

Carolyn Wanke Mangold – Giant Haunted House; carve the roof, build chimneys, stairs and brickwork

There was excitement amongst the visitors and enthusiasm amongst the people working on the cake. Everyone was eager to see the cake post finishing touches.

Once completed, Kerry Vincent (the show director) said that it was as perfect as everyone working on it had imagined!

FondX donated a lot of fondant to build this large cake, making sure that everything from our end was possible, to bring this cake come alive!

Please enjoy a short snippet (below) of The Oklahoma Sugar Art Show.

The 2010 Oklahoma Sugar Art Show

Team Caljava had attended the 2010 Oklahoma State Sugar Art Show in Tulsa, Oklahoma. This event was the most competitive cake competition in the U.S., and the second largest in the world. The event had a grand prize of $25,000 and had received a number of sponsors too. Caljava has sponsored over $18,000 in contributions this year.

The show was all about cakes and with free imagination the possibilities were endless.

We saw sculptures, birthday cakes, wedding cakes, cupcakes and cookies.

During the event, a lot of people saw FondX at the stalls first, where they could try it and see the professionals use it in competitions. This was a perfect example for the right public.

Kerry Vincent, the show director of Oklahoma State Sugar Art made things possible with her inputs.

For the competition, participants used FondX to decorate cake. Fondx owes a lot to Kerry Vincent for giving it the right stage.

FondX was appreciated for a number of reasons during the competition:

  1. It doesn’t crack or tear.

  2. It was very consistent, which means that every time you open a pail, you don’t have to learn a new product

  3. It is a whole new formula.

  4. Available in 17 colors, and it was accordingly mixed and used during the competition.

  5. It is softer (as compared to other fondants) and has a nice smooth taste.

  6. Easy to use for experts as well as beginners.

Please enjoy a short snippet (below) of The Oklahoma Sugar Art Show.

How to use Ready-Made Gum Paste Flowers

Decorating your cake can be as enjoyable as eating it. Maybe even more.

With thousands of ideas all over the net, here is a demo to help you place ready-made Gum Paste Flowers on a birthday cake.

Things you need:

  • Ready-made Gum Paste Flowers
  • Rolled Fondant

  • Straw (optional)

Ready with the items, follow the steps below:

  1. Unwrap the Gum Paste Flower out of the packaging. Do it nicely so that you do not harm them.

  2. Figure out where you want the flower to be placed. For example, in the video (below), we have placed it on the side.

  3. Place it on your cake. You can either place it directly or to make it a little more sanitary you can use a straw. If you decide to place it directly, stick the wire straight through the cake.

  4. In case of straw, figure out the height you want and cut it a little bit under the height so that you cannot see the straw coming out at the top. Once done, you can place it inside the cake and take the end of the wire and bend it to how you want it to look at the top of the cake.

  5. So, now as the flower is on the cake, feel free to move the petals around and adjust it according to your need.

Please note: While handling the Gum Paste Flowers, you need to be delicate with them so that no flower is harmed.

How to Use Ready-Made Cupcake Toppers

Cupcakes are sweet and fancy-friendly!

Yes, fancy-friendly. With that, all we wanted to say that you can decorate them as you want, and every time it looks cute and amazing.

However, if you are short on time, here is an easy decorative tip.

Use the ready-made cupcake toppers.

For this, you need:

  1. Ready-made cupcake toppers

  2. Cupcakes

Yes, that’s it!

So, to use these ready-made cupcake toppers, follow the steps below

  1. Place a few out of the box. Don’t stack them up, keep them separately.

  2. Now, begin by placing them on the top of mini cupcakes and give them a twist.

And… it’s done!

Your cupcake is cutely decorated with cupcake toppers.

For your information:

Why ready-made cupcake toppers?

  1. They save time.

  2. They are easy to use.

  3. They are well-packed and you need not worry about they are going to be broken or cracked, because they package them individually.

Bonus Cake Decorations tip: While choosing these toppers, make sure you have a box in which there are nice little colorful bows. Cupcake toppers should be a mix of colorful ribbons so that you have a variety to choose from.

How to use Luster Dust with an Air Brush on a cake

If you have bought luster dust, follow the steps below to decorate your cake.

Things you’ll need:

1. Luster dust

2. Vodka / Clear Spirit

3. Airbrush

Steps:

  1. If you have purchased Luster Dust (6 gm bottle) from our store, you need to just add vodka/ clear spirit and shake it. You can use it straight from the bottle. Please note: We normally offer luster dust in a 2 gm bottle, but for airbrushing it is provided in a 6 gm bottle.

  2. Next, take your airbrush and pour the mixture a little bit in. Tip: Pour enough so that you can cover the entire cake. However, don’t add too much at the start. In case you feel the mixture isn’t enough, you can always add more, later on.

  3. Now, start the airbrush and start spraying it all over the cake in a circular motion. Start out light and gradually work your way out around the cake, bottom and towards the middle.

  4. Once done, check for areas missed. Spray them and you are done!

For small cakes, a normal airbrush can be good enough. However, in case of a three-tier / five-tier wedding cake or a larger cake, it is definitely quicker to use out airbrush.

Bonus Cake Decoration tips:

  • Instead of vodka, you can use lemon extract or vanilla extract too, but as it is much thicker, the airbrush may be more prone to clogging. However, you need not worry as the clog is just dust, and when it dries the power from the airbrush will just clear it out.

  • You can even use the cheapest vodka available in the market.

How to Open a FondX Pail: 10 lbs

FondX has been a popular product of cake decorations and people are loving it.

However, there were a number of requests from the buyers that they found it difficult to open the lid of a FondX Pail: 10 lbs. If you fall in the noted category, this demo is for you.

We suggest a way to open it which may look a bit unconventional, but it works every time for us.

For this, you need:

  • A pair of scissors or pruning shears that you might have used for your garden. (In this demo, we have used pruning shears, as they are easier to hold)

  • A FondX Pail: 10 lbs

  • A normal bottle opener

Before planning to open the lid, have a brief look around the lid. You might have noticed little slits on the pail and little holes that are perforated. Note: There is an air tight seal which can be difficult to open, specially if you have delicate fingernails. The main purpose of the seal is to keep the product fresh.

Steps:

  1. To start with it, cut the slits open.

  2. Take a normal bottle opener’s flat end and pry it underneath the lid. With this, the air tight seal loosens and it should be pretty easy there on.

Another question here is about storing the fondant.

A simple way to store it is to take the excess fondant that comes off the cake and put it in a zip lock. This zip lock can be then put into another zip lock. Once you are done with it, put the double zip lock pack in the pail, put the lit back and shut it.

The idea is to keep it moist, which will make it good for next time use.

How to use Elegant Lace Molds & CMC with Fondant: FondX

If you have bought Lace Molds and want to use it to decorate your cake, follow the steps below and get surprised:

  1. Firstly, knead 1 tsp of CMC into 1lb of FondX. CMC is often used to create shapely moldings, flowers and bows. CMC is used as a fondant stabilizer that can transform FondX into your own tasty gum paste.

  2. Make sure you knead thoroughly. This will increase elasticity and help achieve gum paste quality.

  3. Once done with the kneading process, use a luster dust Pump Brush to prepare your Lace Mold.

  4. Roll FondX and try to form a shape of a snake.

  5. Now, place it into the Lace Mold. Make sure you press it firmly into the mold, which will ensure fine details on FondX.

  6. Mix CMC and water and use the mixture to glue finished molding to the cake.

There are many Lace Molds, which include a cutter in the shape of your desired design. If you wish to used them instead, follow the tips noted below:

  1. Use the cutter to cut FondX in the shape of the cutter.

  2. Remove excess FondX and store it for later use.

  3. Make sure that you dust the Lace Mold with Super Pearl, preventing fondant from sticking on to the mold.

  4. Now, place cut-outs into appropriate molding.

  5. Press and spread to achieve the details.

  6. Finally, remove them and adhere onto the cake. Note: Remove it gently; otherwise the FondX might crack or tear.

How to cover a cake with Rolled Fondant: FondX

Many people have requested a demo on covering a cake with rolled fondant.

Here are two ways of doing it.

  • Manually

  • With the help of a Fondant Lifter

For the manual process, follow the steps below:

  1. Measure your cake.

  2. Take a portion of FondX. This portion should be about 1lb per 8-inch cake.

  3. Knead this portion in small amounts. You can roughly make them of the size of your fists. Remember, kneading is the most important part of using Fondx. So, don’t rush through this process. Have patience and continue kneading.

  4. Now, twist FondX like pie dough so that air bubbles can be prevented.

  5. Next, apply high-ratio shortening to hands and knead into Fondx. Shortening in this process will help prevent the product from cracking and tearing. This is important, as you don’t want to see a torn edge, when you cover your cake with the rolled fondant.

  6. Roll the fondant to an 1/8-inch thickness.

  7. Apply small amounts of cornstarch to prevent the Fondx from sticking.

  8. Use a rolling pin and gently roll FondX. Once done, you are ready to apply it on the cake.

  9. Place it over the pre-iced cake and unravel it.

  10. Use your hands and a cake smoother to adhere Fondx to the cake.

  11. Finally, cut and save FondX for later use.

Another form of FondX application is with the use of Fondant Lifter.

Place the Fondant Lifter and apply the same kneading process.

Once done with the kneading process, change the route and follow the steps below:

  1. Roll FondX onto the appropriate sized rings. Make sure that you keep the thickness same as noted above, i.e. 1/8-inch thickness.

  2. Now, lift the outside ring and allow the rolled FondX to hang.

  3. Place the Lifter over the cake and begin smoothing

  4. The smoothing process is same as noted above.

In this way you can decorate a cake with Rolled Fondant. Hope this will help you!!!